Pages

Wednesday, August 17, 2016

4 Ingredient Turkey Sticks

By Alicia of Lollygag Learning


Only four ingredients go into these easy turkey sticks! Nova loved exploring a new food and feeding herself this wholesome, simple dinner. They are great for Baby Led Weaning because your little one can grip the turkey for self feeding and the texture is easy to nibble on. If you want to try Baby Led Weaning, but find it a little nerve-wracking this would be a great recipe to try!

4 Ingredient Turkey Sticks
  • 16 oz package ground turkey
  • 1/4 c pumpkin
  • 1/4 c baby oatmeal
  • 1/8 tsp cumin
Mix ingredients together with hands and form into log shapes. Brown on all sides in an oiled cast iron pan. Bake at 350° for 20 minutes.

I used canned pumpkin puree from the baking aisle. If you can’t find pumpkin you can substitute baked and mashed acorn squash, or you can even try a jar of butternut squash baby food puree. It’s fun to experiment with different ideas! My idea for this recipe was inspired by meatballs. The pumpkin holds the ingredients together as eggs would, and the oatmeal gives the turkey a light texture. When mixing ingredients together, you will be able to feel if you need to add a sprinkle of oatmeal or an extra dollop of pumpkin.


I made a batch of Turkey Sticks and used a flash freezing technique to store for quick meals. This process, a.k.a. freezer cooking, takes a lot of stress out of our dinner routine. I love being able to cook once, and freeze several portions. Not only does freezer cooking save me time, but it also saves me from throwing away leftovers that got too old.  

To flash freeze, line a baking sheet or cutting board with wax paper. Place the turkey sticks on the sheet, spaced out so they are not touching each other. Freeze several hours until frozen solid then store in a zipper freezer bag. To defrost, simply warm with your microwave or toaster oven.

When I defrosted the Turkey Sticks for dinner a few days later, I served them with steamed asparagus and diced cherries.


Another time, I served the sticks with a side of peas and pears for Nova, and Josie had a side of tortellini. 

Thank goodness I had my Bumkins Splat Mat ready to catch all of the mess! Josie (2.5 years old) is learning to keep her food on her plate, but the Splat Mat saves me a lot of sweeping and mopping after Nova’s meals. I lay it down under her chair before her meal then I shake the crumbs into the sink before tossing in the washing machine. It’s like a giant bib for the floor! Sometimes I even sit these sweet sisters next to each other and they both fit under the Splat Mat. They are too cute sharing their meals!


Tuesday, August 9, 2016

A Young Barista Makes for Healthy Eater


Coffee is where it all started. One morning, I sleepily realized that showing my baby how to push the “on” button on the espresso machine would be like pushing a button on a toy truck or an elevator, but so much more productive and exciting for both of us. Brilliant. Oliver got to push a button and get hugs, kisses, and thank yous from me while listening to the loud buzz-hum of the machine and watching the mysterious dark liquid drip into a cup…all while being held by me, bursting with pride. I wondered if, on a subconscious level, he was ever curious about what was in the daily beverage that would transform his weary, sleep-deprived mom into a more cheerful, more engaged, temporarily less-exhausted version of herself.

Our mini-barista became indispensable to the morning routine. (One of his very first sentences was instructing his dad to “Make Mama latte.”) Soon, he was hanging out and watching me cook with keen interest. He got to stir the batter for pancakes, mash bananas for banana bread, and mix spoonfuls of applesauce into plain yogurt. 

I was on a mission to raise a child who was comfortable in the kitchen. Before my son was born, I had gone back to school to study nutrition and then after his birth, had taken a break from my graduate program to be with him full-time.  I reasoned that role-modeling positive eating behaviors (veggies – yum!) and introducing my child to the process of planning meals, shopping, and cooking would benefit him from a life skills perspective and a nutritional one. Plus, it would be a great way to test out those theories about shaping healthy eating behaviors that I had learned in school.  

Our baby quickly grew into a toddler who was eager to explore the many things he could do all by himself. All day long, Oliver and I had negotiations about things he could do with help or without help (or his least favorite category: oh no, never never never, you have to help me keep you safe and be helpful, please!). I knew it was my job to give him limits and it was his job to test those limits, but…it was going to take more than just a latte to get through that phase. 
Having playdates in the kitchen was a great place for us to practice working together by doing simple and safe food prep tasks. Of course, when he was just a year old, he couldn’t do anything in the kitchen by himself. Often, when we started a task, I would say “you start, I’ll finish,” or “I’ll start, you finish.” Either way, we were getting the job done together.

As he matured into an older toddler, he could do a little more and I could do a little less. Finally, he was able to do more and more things completely on his own. Sprinkling shredded cheese on a tortilla for a quesadilla, beating eggs, adding ingredients to a bowl of pasta, and putting a slice of turkey on a sandwich were things that he could do with a little help. Eventually, he learned to pour milk from a small cup into a bowl of dry cereal; it was kind of cool to have a toddler who could “make” his own breakfast. He was very proud of himself each time he mastered a new skill in the kitchen, which happened more and more quickly. 

Spending time together in the kitchen became a family tradition, so it was natural to let our second and third sons help out too. I credit these early kitchen playdates with getting each of them off to a good start as happy, healthy eaters. Each of them went through a “picky eating” phase (the researchers call it “neophobia”, or the fear of new foods). But I am confident that their cooking experiences gave them exposure to foods in ways that helped to minimize their neophobia.

Cooking with your child can be an adventure, a gift, a chance to learn; it can be an opportunity for science education, math practice, language development, and learning to work as a team. Best of all, kitchen playdates can be about creating happy memories in addition to delicious and nutritious food for the family.

Here are some ideas (thanks, Johanna Donnenfield, MS, RD!) for ways that your toddler can help out in the kitchen in five minutes or less:   
  1. Fetch cans and packages from low shelves or cabinets
  2. Peel bananas
  3. Roll or crush crackers to make cracker crumbs
  4. Slice soft foods (cooked potatoes, bananas) with a table knife
  5. Pour liquids from small containers into bowl
  6. Wash fruits and vegetables
  7. Stir batters with whisks
  8. Use a rotary egg beater (with supervision)
  9. Place toppings on pizza or snacks (ants on a log)
  10. Spread soft textures with a table knife

Wednesday, July 27, 2016

Pumpkin's Donut Birthday Party


Pumpkin, my oldest, turned 5 this summer and the kid is obsessed with birthday parties. She comes up with so many party themes that she’s got her birthday celebrations planned out for at least the next five years. (If you’re curious, future events may involve Star Wars or roller skating.)

This year, we decided to have her party at the i.d.e.a. Museum, a local children’s museum where we are members. The party includes the room, some decorations and an art project for the kids,  plus admission to the museum all day. It’s pretty low maintenance, but we wanted to put our own spin on it nonetheless, so Pumpkin and I settled on a donut theme. She loves donuts! (But who doesn’t?)

She helped me pick out the plates, napkins, straws and candle from our favorite local party store, Petite Party Studio, and the canisters for the donut holes from Michael’s.  We ordered invitations and a banner from Etsy.

I wanted to include her in the planning because she definitely has her own ideas about how things should be, but I wanted to have a few surprises, too.


Donut Shirt
Pumpkin didn’t know until the day before the party (her actual birthday when she opened gifts at home) that I ordered her a special shirt to wear. Funny story – remember earlier when I told you she loves birthdays? Well, on her birthday, she woke up at 1:30 in the morning ready to start the day. Luckily, my husband was able to get her back to sleep. Then on the day of the party she woke up and got dressed in her new shirt before ever coming out of her room. She still needed a shower before the party so I had her change pack into pajamas, but we were cracking up because this is something we ask her to do every day before school but she has only ever done it once or twice before – she was just so excited for her party!  


Cake
She knew I would be picking up donuts and donut holes for the party, and serving flavored milks for the kids and cold brew for the grown-ups. She didn’t know that I also ordered chocolate cake (her favorite!) shaped like a donut. It was a hit!


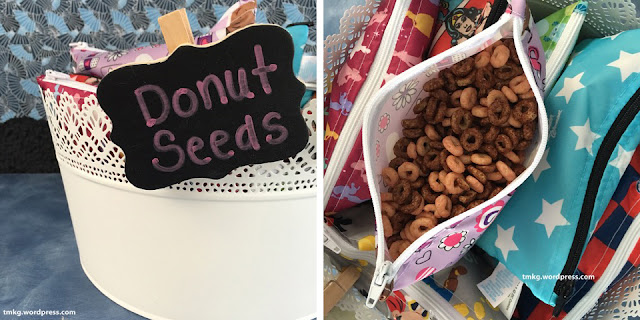
Donut Seed Favor Bags
I will confess that I’m not a huge fan of party favors because our kids have so much stuff already. (In fact, we usually ask our guests not to bring gifts, although this year Pumpkin requested donations instead.) When we’ve done parties before, the gifts have been edible, and they were this year as well! She picked her favorite patterns of Bumkins’ small snack bags as favors (which I love because they are reusable and machine washable, and she loves because they have her favorite characters). The surprise for Pumpkin was what I put inside – donut seeds! These were simply strawberry and chocolate Cheerios mixed together. We rarely get chocolate cereal (this was actually probably a first in our house since we’ve had kids) so the girls were pretty excited.


Pumpkin had a great time at the party painting and playing with her sister and their friends at the museum – and of course, all the sugar involved! If you can’t splurge a little on your birthday, when can you?

Friday, July 1, 2016

10 Summertime Poolside Essentials

My oldest was born in Reno, and in her first 18 months she was in a pool exactly once and it was at a resort casino – how’s that for a stereotype? 
When she turned a year and a half in January of 2013, we signed her up for her first swim lessons at an indoor pool and I remember driving there in the snow thinking what an odd time to be swimming.
The timing worked out, though … at the end of March that year, I accepted a job in Phoenix, and we moved back to Arizona (my husband grew up here and I had previously lived here). 
Summer must-haves
Now my oldest is 4 and has a 2-year-old sister. Here in the Valley of the Sun, we find ourselves in the pool much more frequently – at our friends’ houses, pool parties at the rec centers, etc. And so many splash pads, too!
We also have our girls enrolled in swim lessons every summer to help them learn to be safe around the water. Their lessons are four nights a week, so we always have our poolside essentials ready to go.
Poolside Essentials:
  • Sunscreen: This is a must in the summer, and really should be a year-round habit. Our kiddos get slathered every morning before school and every evening before we head to the pool. 
  • Swim suits: Sometimes the girls wear traditional swimsuits, sometimes I put them in long-sleeve tops with UV protection. 
  • Swim diapers: Our oldest is done with diapers. For our youngest, we love the Bumkins swim diapers that can be worn over and over again. Of course, I love that we are not throwing disposables in the landfill. But let’s be honest – I also love the cute patterns and the fact that they look much nicer under a swimsuit. 
  • Water shoes: The girls need slip-proof water shoes both for walking around the pool before and after lessons, and for water day at school. Closed-toe are the safest (and required for school).
  • Towels and cover-ups: To be more efficient during our jam-packed swim-lesson nights, we bring one towel for the parent who goes in the pool and terrycloth robe cover-ups for the girls. 
  • Sun hats: We don’t need these for swim lessons, but for a long day at the beach or pool – or anytime in the sun – it’s best to have the added protection. I’m always concerned about the parts in my girls’ hair getting too much sun!
  • Sunglasses: Sunlight can damage the eyes so, like hats, these are also good to keep handy if you’ll be outside for a while. 
  • Wet/dry bags: We keep these bags everywhere – the diaper bag, the girls’ backpacks for school – and they get tons of use in the summer. The outer pocket can hold sunscreen, goggles, sunglasses and more, while we use the inside pocket to transport wet clothes home. 
Wet/dry bag
    • Goggles: While a parent still goes in the pool with our youngest for swim lessons and she rarely likes to get her head wet, our oldest is a little more advanced and she always wants her goggles on to put her face under the water. Little sis usually demands some after lessons are over to be like her sister. 
    • Water: We’ve held steady over 110 degrees for several days in a row now. I offer both girls water frequently and ask them to drink up and refill their bottles at school so they are hydrated before going out to swim in the heat.
     Hanging to dry

    Thursday, June 30, 2016

    June is Potty Training Month!


    The potty training journey is an emotional one for everyone involved. Little ones are eager to become a big kid, but can get frustrated with the process involved. Parents look forward to getting rid of diapers, but it can be a tough realization that you don’t have a little baby anymore.

    There are tons of methods people use to reach the end goal, and reading all of the articles could leave you confused and back at the beginning. While we won’t tell you that one is best, we can say that to make the process a bit easier, you’ll want to have the right gear. Here are some of our favorite Bumkins products that have come in handy while we’ve helped our little ones down the sometimes-bumpy road of potty training:

    Wet/Dry Bag: Accidents will happen, so it’s best to be prepared. Keep a clean, dry change of clothes handy, and have a place to store the wet, messy clothes with a Wet/Dry Bag. The waterproof back pocket is perfect for clothes, and the front pocket can hold wipes to clean up any messes, toilet seat covers, or any other potty accessories.

    Large Snack Bag: As little ones progress, accidents get less frequent and smaller, so you may not need to bring a full change of clothes. Keep extra underpants in a Large Snack Bag, which can then be used to carry the wet ones after changing.

    Small Snack Bag: Rewards can be the key in motivating some of the more stubborn children. Whatever forms of currency/bribery you use – M&Ms, lollipops, cookies, stickers – keep a stash at the ready in a Small Snack Bag.

    Splat Mat: Sometimes, little ones are so involved in whatever they are playing/watching/reading, they’ll wait too long to make a trip to the potty and an accident can occur. Have them sit on a Splat Mat while they’re focused on their fun and you’ll keep furniture and floors clean and dry.

    While some kids take to potty-training quickly, it can take a while for others. Don’t be discouraged! It can be hard to see the light at the end of the tunnel when you’re in the stall of a public restroom waiting for what seems like forever as your kid does anything but go potty, but know that you will, one day, be able to ditch the diaper bag and enjoy the freedom of a toilet-trained kiddo.

    Wednesday, June 22, 2016

    Painting Fireworks for the 4th!

    By Carly of Carly G. Media

    With everyone in the patriotic spirit, Independence Day is a perfect time to craft with kids. Save your empty toilet paper rolls and grab some red, white, and blue paints to make fireworks the whole family can enjoy.


    What you will need:
    • Red, white, and blue paints 
    • 3 toilet paper rolls
    • 3 paper bowls
    • Scissors 
    • Tape 
    • Paper

    Direction: 
    • Start by cutting strips into one end of the toilet paper rolls. The deeper the cuts, the bigger the firework blast.
    • Pour red, white, and blue paint into separate paper bowls.
    • Have kids dip the fanned out end of the toilet paper roll into the paint.
    • Stamp the toilet paper roll onto a piece of paper.
    • Repeat with each color.
    • Tada! Fun and easy firework art for the holiday.

    Tuesday, June 14, 2016

    Breakfast: An Edible Ode to Dad on Father's Day

    By Jessica a Registered Dietitian-Nutritionist

    Fathers Day Breakfast ideas


    Everyone told us when our first child was born that the time would fly by. They were right. Our three sons are now in fifth grade, first grade, and preschool. The last decade has brought my husband and me more mess, more noise, more laughter, more driving, more potty jokes, more sweetness, more struggle, more laundry, and more love than we ever imagined possible.

    We’re finally down to one five-point harness car-seat and one booster. No more cribs, diapers, highchairs, or strollers. Kid-induced sleep deprivation is no longer an issue. We used to spend many hours arguing over how to sleep-train: Ferber vs. Sears vs. Happiest Baby on the Block vs. Babywise…thankfully, we survived that stage (twice, with our first two kids…the third one loved to sleep, thankfully). My babydaddy and I still wake up too early and stay up too late, but now we can blame Netflix, HBO, and work.

    Every day I am grateful that I picked a great dad for my kids. On our first date, sixteen years ago, he charmed me with stories about his siblings and grandparents. So I knew right from the beginning that he was a family-oriented person.

    Since then, his actions have demonstrated his values. He prioritizes our family’s needs. He’s loving, honest, responsible, kind, a good sport, and very well-organized. He dresses better than me, and almost always knows pop culture references before I do. He’s super goofy, which people don’t really expect at first because he has very good manners. He’s good at explaining things, and making small talk. He’s good at being a friend and teaching our kids how to be a good friend to others. Our kids know that their dad is the expert on camping and hiking. He shows them how to fix things around the house. They know he’s the one to ask about art, architecture, how to organize their desk and what’s going on with just about every sport and playoff situation going on. He explains personal finance concepts, how to run a business, and stuff that’s related to our iPhones and computers. And “he doesn’t make us eat too many vegetables, like you,” said our six-year-old when I asked him to tell me his favorite thing about his dad.

    So this Father’s Day, the kids and I will be showing this very special guy how much we appreciate him with our usual festive traditions. We’ll make breakfast at home, which is very likely to include pancakes with berries and chocolate chips - a recent family favorite. There will definitely be bacon, since my husband loves bacon. Coffee and a green smoothie will also be on the menu (for us, not the kids). There will also be goofy cards and crafty homemade gifts. We always plan the day around doing a family activity, like a hike or a swim. For rainy or too-hot days, we’ve been known to visit to an art museum or an indoor rock climbing gym. Then we always head back home for some down time to relax.

    Here are some Father’s Day breakfasting tips to make the morning fun and energize everyone for a fun day of celebrating Dad: 

    1. Choose one of dad’s favorite recipes; keep it simple to assemble or prepare.

    2. Shop for ingredients the day before to make the morning go smoothly.

    3. Kids can help out too, by arranging fruit on a plate, pressing buttons on the blender for a smoothie, or setting the table. Playing “restaurant” and drawing a menu is fun for preschoolers.

    Recipe ideas: -


    Avocado toast: Toast whole grain bread and spread sliced ripe avocado on it. You can also mix mashed avocado with a squirt of lemon juice and spread it. Add a sprinkle of salt and a dash of pepper. Top with a scrambled, soft-boiled, or fried egg.


    Eggs, hash browns & fruit: My kids love the task of cracking eggs into a bowl and beat them. Use frozen hash browns, or grate your own potatoes. Rinsing fruit is a fun task for toddlers.


    Crepes with Nutella and sliced bananas – Mix up the crepe batter and let it rest in the refrigerator overnight. Or buy crepes, ready-made, at the grocery store.

    Veggie and cheese omelette: Chop veggies the night before and let everyone pick which ones they want to include. Bagel with lox and cream cheese: Shop for these ingredients in advance. Add sliced tomatoes, cucumbers, onions, and capers. Arrange on a plate – voila!

    Breakfast sandwich – a scrambled egg and a slice of melted cheese on an English muffin is always a home run.

    Fathers day breakfast